


如何在当前屏幕的高分辨率下,从图像文件显示ImageIcon?
我想从.png文件中读取一个图标并以半尺寸显示,以利用当今屏幕的更高分辨率。但是我尝试的所有办法都不起作用。
下面是我尝试过的办法:
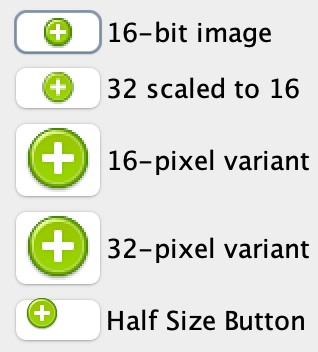
- 在下图中,为了实现“32缩放到16”,我调用
imageIcon.getImage().getScaledInstance(16, 16, Image.SCALE_SMOOTH)。这个方法是在高分辨率屏幕问世之前就编写好的,它返回一个分辨率较低、尺寸为原来一半的图像。 - 为了创建“16像素变体”,我创建了一个具有16像素和32像素变体的MultiResolutionImage,并调用
multiResImage.getResolutionVariant(16, 16),它要求使用16像素变体,希望它能把32僺素变体缩小。它确实使用了32像素变体,但却保持原尺寸。这让我怀疑该类到底有何用处。 - 为了创建“半尺寸按钮”,我创建了ImageIcon的一个半尺寸子类,并重写了用于绘制图像的三种方法。它在某种程度上起作用。这是唯一一个能以正确的尺寸和分辨率绘制图像的解决方案,但它把图像放错了位置。(下方是该类的代码。)
因此以上都不起作用。你可以在 https://github.com/SwingGuy1024/IconFamilyBug 下载最小可复现示例并自行尝试。以下是它绘制的内容:
这是半尺寸的ImageIcon类:
public static class HalfSizeIcon extends ImageIcon {
  private static final float scale = 0.5f;

  public HalfSizeIcon(ImageIcon icon) {
    super(icon.getImage());
    if (icon.getDescription() != null) {
      setDescription(icon.getDescription());
    }
  }

  @Override
  public synchronized void paintIcon(
      final Component c,
      final Graphics g,
      final int x,
      final int y) {
    Graphics2D g2 = (Graphics2D) g;
    AffineTransform savedTransform = g2.getTransform();
    g2.scale(scale, scale);
    super.paintIcon(c, g2, x, y);
    g2.setTransform(savedTransform);
  }

  @Override
  public int getIconWidth() {
    return Math.round(scale * (super.getIconWidth()));
  }

  @Override
  public int getIconHeight() {
    return Math.round(scale * (super.getIconHeight()));
  }
}
以下是完整的最小可复现示例,去除了图标,运行此示例需要图标。
    import java.awt .*;
    import java.awt.geom.AffineTransform;
import java.awt.image .*;
    import java.net.URL;
import javax.swing .*;

@SuppressWarnings("HardCodedStringLiteral")
public class IconFamilyBug extends JPanel {
  public static void main(String[] args) {
    JFrame frame = new JFrame();
    frame.getContentPane().add(new IconFamilyBug(), BorderLayout.CENTER);
    frame.setLocationRelativeTo(null);
    frame.setDefaultCloseOperation(JFrame.EXIT_ON_CLOSE);
    frame.pack();
    frame.setVisible(true);
  }

  IconFamilyBug() {
    super(new GridBagLayout());
    Image dir16 = loadImage("add_16.png");
    Image dir32 = loadImage("add_32.png");
    final var SMALL = 16;
    final var BIG = 32;
    Image scaledImage
        = dir32.getScaledInstance(SMALL, SMALL, Image.SCALE_SMOOTH);
    MultiResolutionImage multiResImage
        = new BaseMultiResolutionImage(dir16, dir32);
    Image var16 = multiResImage.getResolutionVariant(SMALL, SMALL);
    Image var32 = multiResImage.getResolutionVariant(BIG, BIG);
    int row = 0;
    addButton(dir16, "16-bit image", row++);
    addButton(scaledImage, "32 scaled to 16", row++);
    addButton(var16, "16-pixel variant", row++);
    addButton(var32, "32-pixel variant", row++);
    Constraint c = new Constraint().y(row);
    ImageIcon half32 = new HalfSizeIcon(new ImageIcon(dir32));
    JButton halfSizeButton = new JButton(half32);
    halfSizeButton.setToolTipText("Half Size Button");
    add(halfSizeButton, c);
    add(new JLabel(halfSizeButton.getToolTipText()), c);
    final Color transparent = new Color(255, 0, 0, 0);
    setBorder(BorderFactory.createMatteBorder(10, 10, 10, 10, transparent));
  }

  private Image loadImage(String fileName) {
    URL url = getClass().getResource(fileName);
    return Toolkit.getDefaultToolkit().getImage(url);
  }

  private void addButton(Image image, String name, int row) {
    Constraint c = new Constraint().y(row);
    JButton button = new JButton(new ImageIcon(image));
    button.setToolTipText(name);
    add(button, c);
    add(new JLabel(name), c);
  }

  public static class HalfSizeIcon extends ImageIcon {
    private static final float scale = 0.5f;

    public HalfSizeIcon(ImageIcon icon) {
      super(icon.getImage());
      if (icon.getDescription() != null) {
        setDescription(icon.getDescription());
      }
    }

    @Override
    public synchronized void paintIcon(
        final Component c,
        final Graphics g,
        final int x,
        final int y) {
      Graphics2D g2 = (Graphics2D) g;
      AffineTransform savedTransform = g2.getTransform();
      g2.scale(scale, scale);
      super.paintIcon(c, g2, x, y);
      g2.setTransform(savedTransform);
    }

    @Override
    public int getIconWidth() {
      return Math.round(scale * (super.getIconWidth()));
    }

    @Override
    public int getIconHeight() {
      return Math.round(scale * (super.getIconHeight()));
    }
  }

 /**
  * <p>Feel free to expand this class for your own use by adding more chainable
  * setters, following the example of the y() method below, which could also be
  * named row() or gridY(). This is a much more convenient way to use
  * GridBagConstraints. I've found that it's also helpful to add two-parameter
  * methods like {@code Constraint at(int gridX, int gridY)}, along with others
  * for weight(), pad(), and gridSize().</p>
  */
  @SuppressWarnings("AssignmentToSuperclassField")
  public static class Constraint extends GridBagConstraints {
    Constraint() {
      super();
      fill = GridBagConstraints.BOTH;
      gridx = GridBagConstraints.RELATIVE;
    }

    public Constraint y(int gridY) { // All parameters should be set this way.
      gridy = gridY;
      return this;
    }

    @SuppressWarnings("UseOfClone")
    @Override
    public Constraint clone() {
      return (Constraint) super.clone();
    }
  }
}
解决方案
你已经将图形进行缩放来处理图像,但没有调整x、y坐标,使得在应用新变换时它们未处于预期位置。通过改变x、y将缩放后的图像渲染到正确的位置:
super.paintIcon(c, g2, x, y);
改为
super.paintIcon(c, g2, (int)(x/scale), (int)(y/scale));
那么“半尺寸按钮”就应该出现在正确的位置。如果你让 transform 来进行计算,会更整洁:
g2.translate(x,y);
g2.scale(scale, scale);
super.paintIcon(c, g2, 0, 0);
至于第二点,似乎在你构建 MultiResolutionImage 时并未对图像的尺寸进行评估,因此对 getResolutionVariant 的每次调用都会返回最后提供的图像(32x32)。你可以用下面的方法来确认:
System.out.println("var16 "+var16.getWidth(null)+" x "+var16.getHeight(null));
System.out.println("var32 "+dir32.getWidth(null)+" x "+var32.getHeight(null));
显示为
var16 -1 x -1
var32 -1 x -1
要么在调用 addButton(dir16, ...) 之后紧接着声明 var16,要么你可以使用一个图片观察者,在设置var16/32之前等待图像读取完成:
final CountDownLatch latch = new CountDownLatch(2);
ImageObserver observer = (Image img, int infoflags, int x, int y, int width, int height) -> {
    System.out.println("observer "+img+" "+width+"x"+height);
    latch.countDown();
    return false;
};
dir16.getWidth(observer);
dir32.getWidth(observer);
latch.await();
现在对 var16 = multiResImage.getResolutionVariant(SMALL, SMALL); 的调用将得到你希望的16点大小,你将看到:
var16 16 x 16
var32 32 x 32
站内所有文章版权归属LeftHeroAI导航站,无授权禁止任何主体转载、抄袭、复制内容,亦不得私自架设镜像站点。一经侵权,本站将通过法律途径追责。
相关文章






汇集全球数千款 AI 工具,每日持续更新,配套 AI 开发学习资源,轻松用 AI 提升工作效率。快捷键 Ctrl+D/⌘+D 一键收藏本站。